The Appeal of White Oak Cabinets
White oak cabinets are totally rad. They’re like the cool, classic kid in school that everyone wants to be friends with. They’re super versatile and can fit into any style, from modern to traditional. And they’re seriously durable, so they’ll last forever.
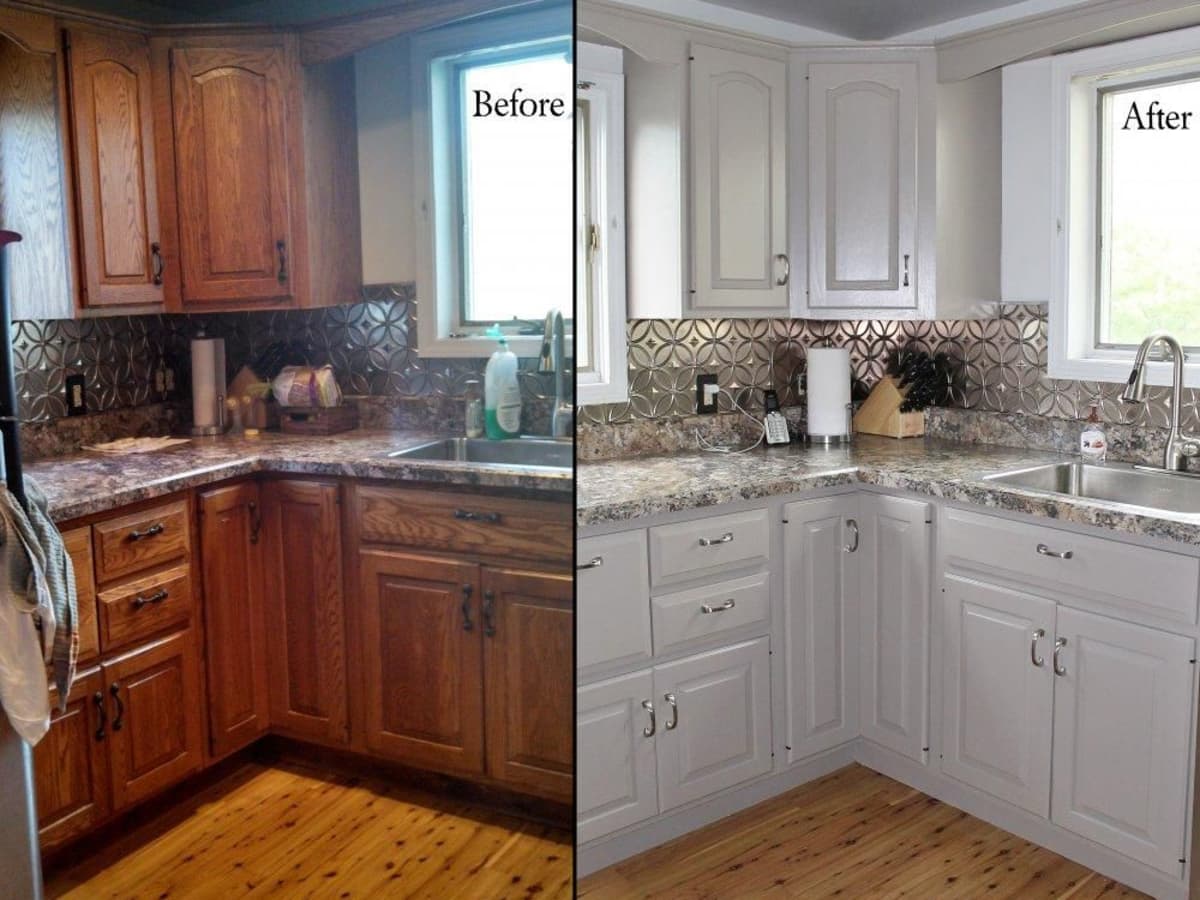
Benefits of Painting Oak Cabinets White
Painting oak cabinets white is like giving them a fresh, new look. It can totally brighten up a space and make it feel more modern. White is a super neutral color, so it goes with everything. It’s like the blank canvas of the design world. You can add pops of color with your decor and accessories, and the white cabinets will just make everything look amazing.
Different Styles and Finishes for White Oak Cabinets
There are so many different ways to style white oak cabinets. You can go for a sleek, modern look with a matte finish. Or you can go for a more traditional look with a satin or semi-gloss finish. You can even get creative and add some cool details, like distressing or glazing.
Painting white oak cabinets is like giving them a makeover. It’s a super easy way to update your kitchen or bathroom and make it look totally fresh.
Preparing for the Transformation: Painting Oak Cabinets White

Okay, so you’re ready to give your oak cabinets a total makeover? Awesome! But before you start slapping on the white paint, there are some crucial steps you need to take to make sure the paint sticks like glue and lasts forever. Think of it like prepping for a big night out – you gotta get ready, right?
Painting oak cabinets white – This stage is all about making sure your cabinets are ready to receive their new white coat. We’re talking about cleaning, sanding, and priming – the holy trinity of cabinet prep.
Cleaning the Cabinets
Cleaning is super important because it gets rid of all the gunk and grime that could interfere with the paint. Think of it like washing your face before putting on makeup. You don’t want any dirt or oil messing things up, right?
- Start by removing all the hardware – knobs, pulls, hinges, the whole shebang.
- Use a good degreaser to clean the surfaces. This will remove any grease, oil, or wax buildup.
- Rinse thoroughly with water and let the cabinets dry completely.
Sanding the Cabinets
Sanding is like giving your cabinets a mini spa day. It smooths out any imperfections and creates a better surface for the paint to adhere to.
- Use a fine-grit sandpaper, like 120-grit, to start. This will remove any rough spots or scratches.
- If you’re dealing with a super glossy finish, you might need to use a coarser sandpaper, like 80-grit, first.
- Sand with the grain of the wood. This will help prevent scratches and make the surface smooth.
- After sanding, wipe down the cabinets with a tack cloth to remove any dust.
Priming the Cabinets
Priming is like putting on a base coat before your makeup. It helps the paint adhere better and creates a smoother, more even finish.
- Choose a primer specifically designed for painting over wood.
- Apply the primer in thin, even coats. Let each coat dry completely before applying the next.
- If you’re using a dark paint, you might need to use a primer that blocks stains.
Choosing the Right Paint and Primer
When it comes to paint and primer, you want to make sure you’re using the right stuff. This will ensure your cabinets look amazing and last for years to come.
- For the best adhesion and durability, use a paint specifically designed for cabinets. Look for a paint that’s oil-based or water-based, depending on your preference.
- Choose a primer that’s compatible with your chosen paint.
- If you’re painting over a dark stain, you’ll need to use a primer that blocks stains. This will prevent the stain from bleeding through the paint.
Safety Precautions
Safety first, always! When you’re working with paint, you need to take some precautions to protect yourself and your space.
- Wear a respirator mask to protect yourself from paint fumes.
- Wear gloves to protect your hands from the paint.
- Work in a well-ventilated area. Open windows and doors to allow fresh air to circulate.
- Cover the floor and surrounding areas with drop cloths to protect them from paint splatters.
Painting Techniques and Tips

Painting oak cabinets white can be a fun and rewarding DIY project. You can transform your kitchen or bathroom with a fresh, modern look, but it’s important to use the right techniques to achieve a professional finish. We’ll explore the best methods for applying paint to oak cabinets, ensuring a smooth and even surface.
Applying Paint
Applying paint to oak cabinets can be done in a few ways, each with its own pros and cons. Here are the most common techniques:
- Brushwork: This method is ideal for small areas and intricate details, like cabinet door trim or drawer pulls. Using a high-quality brush, apply thin coats of paint in the direction of the wood grain, ensuring smooth and even coverage.
- Rolling: For larger surfaces, like cabinet doors and drawer fronts, a roller is the most efficient option. Use a high-quality roller cover designed for smooth surfaces, and apply paint in even, overlapping strokes.
- Spraying: Spray painting is the fastest and most efficient method for large areas, but it requires more preparation and expertise. Use a quality HVLP (high-volume, low-pressure) sprayer and apply paint in thin, even coats. Make sure to spray in a well-ventilated area and wear a respirator mask.
Achieving a Smooth Finish
Achieving a smooth, even finish is essential for a professional look. Here are some tips to help you achieve this:
- Sanding: Before painting, lightly sand the cabinets with fine-grit sandpaper to create a smooth surface and remove any imperfections. Be sure to wipe away dust before painting.
- Primer: Use a high-quality primer specifically designed for cabinets. This will create a smooth, even surface and help the paint adhere better. Apply two coats of primer, sanding lightly between coats.
- Thin Coats: Apply thin coats of paint, allowing each coat to dry completely before applying the next. This will prevent drips and runs and help the paint dry evenly.
- Brushstrokes: To avoid brushstrokes, use a high-quality brush with soft bristles and apply paint in thin, even strokes. Always follow the direction of the wood grain for a natural look.
Handling Tricky Areas
Cabinet doors and drawers can be tricky to paint, but with the right techniques, you can achieve a professional finish. Here are some tips:
- Cabinet Doors: Remove the doors from the cabinets and lay them flat on a clean, dry surface. This will make it easier to paint all sides evenly.
- Drawers: Remove the drawers and paint them separately. Use a small brush or roller to reach the corners and edges. For drawer fronts, you can use a roller or spray paint for a smooth finish.
- Handles and Knobs: Remove the handles and knobs before painting. You can either paint them the same color as the cabinets or use a different color for a contrasting look. After the paint dries, reattach the handles and knobs.
Painting oak cabinets white can be a game-changer, instantly brightening your kitchen. But don’t forget the finishing touches! Adding a touch of whimsy with hanging ball lights for bedroom above your newly painted cabinets can create a modern and inviting atmosphere.
Whether you choose a sleek, minimalist style or a playful cluster of globes, the right lighting can make all the difference in showcasing your freshly painted cabinets.
Painting oak cabinets white can be a dramatic transformation, giving your kitchen a fresh, modern look. But sometimes, you need a touch of magic to complete the vibe. Maybe you want to add a little whimsy with some harry potter bedroom lights above your cabinets, or maybe just a sprinkle of fairy dust.
Whatever your style, a little magic can go a long way when it comes to home decor.
